Reverse engineer whispersync
May 26, 2020
I am a big fan of my Kindle. This is the device I’d bring over to a desert
island. I am also a fairly frequent user of the highlight feature where you can
select a bit of text you like and save it. One thing is bothering me though:
the lack of open API on the Kindle to retrieve the data about me. Amazon
provides the my-clippings.txt file on the Kindle and the “Export my
annotations via e-mail” feature, but both these features cannot be done in the
background automatically, and the last read position is not available. I want
moar !
I want to get the raw data:
- to print a little book with all my annotations
- to retrieve my last read position and see in which periods of my life I tend to read most (reading less would be a good indicator of stressful periods)
- to put the data in my own personal space : my cozy (I work there). I could for example randomly display favorite quotes in my Cozy-Home, or have a “books” app with a public page with all my books. That would be the digital equivalent of a bookshelf. The bookshelf as a means of sharing good books that you’ve read is lost with the Kindle. I wish I could easily share with my friends my reading list. goodreads.com would be another way to do that, but I’d prefer to have the data at my disposal.
The possibilities are endless… but first, I needed to get access to the data. A long time ago, I tried to access this data via Kindle web but could not pass the login screen via scraping: there was if I recall well, credential encryption on the application side, and I had not managed to redo it correctly.
Recently, I have seen a presentation on using mitmproxy to discover HTTP APIs used by apps. It gave me motivation to start again on this project: this time, instead of web scraping, I’d try to understand how the Kindle communicates with Amazon and try to emulate the same HTTP requests to access my data.
Setup a man in the middle on a Kindle app
Disclaimer: do not attempt man-in-the-middle attacks on devices or accounts that are not your own. To successfully conduct this project, you need to have physical access to the device to install an SSL certificate authority.
To see the flow of communication between an Android device and a remote HTTP based APIs, things are a bit more involved than from a web browser: in the web world we have access to the network inspector which helps us record data, replay calls, see requests and responses, etc… There is no such thing for Android or iOS. The solution is to do a man-in-the-middle attack on our device: proxying and recording all traffic through a controlled access point.
The setup is briefly described below:
- A Raspberry Pi runs as a wifi access point (through hostapd)
- Every packet going through the access point is redirected to mitmproxy (in the transparent mode fashion)
- HTTPs man-in-the-middle is made possible thanks to a custom CA authority installed on the whispersync client device
- A real or virtual (for example with Genymotion) Android 5 device
- Kindle for Android installed on the Android device (the Play store can be installed on Genymotion)
ℹ️ It is also possible to use iOS but it is easier to have access to a virtual Android device since you do not have to own a Mac
ℹ️ On Android, it is possible to use user certificates until Android 7 Nougat. After Android 7 Nougat, apps will not use user certificates by default. More information here.
Here is a good article to set everything up.
After all this setup (a bit long and tedious but not hard), it is possible to record HTTP dumps of the traffic between the Kindle app and Amazon.
ssh pi@192.168.50.10
tmux a -t 0
# launch mitmdump and write request/response to outfile
mitmdump --mode transparent -w outfile
# Use the Kindle app to generate traffic
# ctrl-c to stop the proxy
exit #
At this point, outfile contains all the requests and responses in the
mitmproxy format.
Recording HTTP dumps
mitmproxy uses a custom format to store dumps. It is not very interoperable: querying and extracting data from the dumps is a bit difficult. HAR is a standard format used for example in Chrome and Firefox (Network inspector tabs in both browser can import/export the HAR format). The HAR format underlying format is JSON which makes it readable and interoperable with tools like jq that are really handy for filtering / querying.
The mitmproxy repository contains a script to transform a mitmproxy dumpfile into a HAR file.
To convert a mitmproxy dump into an HAR file:
git clone https://github.com/mitmproxy/mitmproxy.git mitmproxy # to have access to the HAR conversion script
pip install mitmproxy # to have the mitmdump command

# Extract the dump from the Raspberry Pi
rsync -aPrs pi@192.168.50.10:outfile dump.mitmproxy

# Convert mitmproxy format to HAR format (JSON based format)
mitmdump -vvv -n -r infile.dump  -s mitmproxy/examples/complex/har_dump.py --set hardump=./outfile.har
Understanding the flow
With jq, we can extract requests URLs, which is handy to start understanding the flow of communication between Amazon and our device.
$ cat dumps/dump.har | jq -rc '.log.entries | map(.request.url)'
"https://54.239.22.185/FirsProxy/registerDevice",
"https://54.239.22.185/FirsProxy/registerDevice",
"https://54.239.22.185/FirsProxy/registerDevice",
"https://54.239.22.185/FirsProxy/registerDevice",
"https://54.239.22.185/FirsProxy/getStoreCredentials",
"https://52.46.133.19/FionaTodoListProxy/syncMetaData",

# Unique URLS
cat dumps/dump5.har | jq '.log.entries | map(.request.url) | sort | unique'

# Filter all requests with a particular URL
cat dumps/dump5.har | jq '.log.entries | map(select(.request.url == "<MY_URL>"))'
Registration and request signing
The first call the device makes when logging in is a registerDevice call. It
contains both login and password and is used to register a device on Amazon.
After replaying this request through curl, I had a “Wrong password”
response. It is because Amazon sends a two factor authentication email and you
have to replay (again) the registerDevice call with the value from the two
factor authentication email in the password field to get through.
At this point a new device is visible on Amazon Kindle site 🙌. The next things to do is to fetch the list of books.
The problem now is that we can see that every subsequent request to Amazon has
a X-ADP-Request-Digest: every request is “signed” with the help of a
certificate received in the registerDevice call.
Below, you can see an example request on the syncMetadata route used to get the
list of books:
{
  "startedDateTime": "2020-05-10T14:21:42.217752+00:00",
  "time": 6532,
  "request": {
    "method": "GET",
    "url": "https://52.46.133.19/FionaTodoListProxy/syncMetaData",
    "httpVersion": "HTTP/1.1",
    "headers": [
      {
        "name": "X-ADP-Request-Digest",
        "value": "SIG1tis85OWFqJqbzy0Z0xBzBCI3/88e9p/2jr8UvTAUQCuil5ED0833peNeKPp1dIMdVAs/INcUR//xvCJu+ngyP9olVSda/IBBxM2fftVGIDEVuQqMSC9P+O/pZMhaAJpvxIm78M52OB+lNIYXjE0Kr1OB0mmOo4iVu45aRio8hZDlmDG07zjVHnlQHE5sUjzOMnYBFC6VXw+srjYfo6dTptwSKNX11A0naG+tjcuxnglAE3R9U8/+pVr/uFNT4ou+0cQs2KbV0/4tYEIbOogC1JgjNNt4hyb2l91QED7Aj+A/DFcKBT+XNkjAUAAI1//HhCtxqCNtbu1E1sRReQ==:2020-04-10T14:21:40Z"
      }
    ]
  }
}
Signing the request means that I needed to use the right key to sign (I was pretty confident that the privateKey receive in the registerDevice call was the one to use) sign the right data = find the fields from the request (and in which order) that were used to make a fingerprint of the request
Fortunately, after a bit of searching I came across the repositories of lolsborn (readsync and fiona-client) that had implementation of request signing for the whispersync API.
        data = "%s\n%s\n%s\n%s\n%s" % \
            (method, url, time, postdata, self.adp_token)
        rsa = RSA.load_key_string(str(self.private_pem))
        crypt = rsa.private_encrypt(hashlib.sha256(data).digest(),
            RSA.pkcs1_padding)
        sig = base64.b64encode(crypt)
From readsync source code.
From this bit of code, I could see which fields were used and in which order. I now needed “only” to convert it to Javascript.
With the help of node-forge and node-rsa, after a fair bit of struggle, I managed to have the right signature. I found it difficult even with two example implementations to get the signature exactly right (I am not an expert in crypto technologies and did not know both libraries, so I spent a little bit of time trying to jam the certificate and values in every possible ways 🙃).
Having a bad signature is not immediately obvious since you have to send a
request to Amazon to check it (and if it’s bad, Amazon sends an Internal Server Error). Using a recorded dump to have an example of the right
signature and using it in a Jest test with a fixed date (since the date is
used in the request) was very helpful as the feedback loop was very quick.
⚠️ I had to use two different libraries to get the same signature. I am sure it is possible to use only
node-forgethough. ℹ️ The private key is a PKCS8 certificate in DER format encoded in base64. ❓I wonder why to sign the requests, the devices do not generate a private/public key pair and transmit the public key to Amazon: it is a bit unusual to have something private fly on the network.
Sidecars
After cracking the signing part, it was possible to call the syncMedata
route, with a proper digest header, to get all the books in our library
(yay!).
But, the challenge was not done yet: I was most interested in getting the metadata on the book: my highlights, annotations and last page read. I needed to find the call that was retrieving all this data.
When searching for the content of a highlight in the dump, I could not find anything 🤔. When filtering the URLs of the dump with the identifier of the book (the ASIN in Amazon parlance), some URLs looked interesting:
https://72.21.194.248/FionaCDEServiceEngine/FSDownloadContent?type=EBOK&key=<MYASIN>
https://54.239.26.233/FionaCDEServiceEngine/sidecar?type=EBOK&key=<MYASIN>
FSDownloadContent was the call to get the content of the book. But what was
the sidecar URL ? Sidecars sounds like something loaded to the side of the
book, maybe containing annotations ?
The body of the response was base64 encoded, and after a base64 --decode,
bingo! I could read the content of my book highlights into my terminal.

Now, this is a proper sidecar
# Using the ad-hoc CLI tool to fetch a sidecar in binary format and decode it
$ yarn -s cli fetch sidecar --no-parse B01056E716 | base64 --decode
CR!3WET39TJ553PXCAHWBHXQ1RT_PAR^̵]^̵]BPARMOBI&&<@6^^ !b#f$%*f"V        F
BPAR8FYDATApce plaisir puis dans l agressivit ainsi que cet amour de la servilit grgaire n
DATAC tait la mme illusion, procdant de la mme volont de s illusionner soi-mme.8
DATAon n avait pas encore invent le systme actuel qui consiste  assommer les gens  coups de matraque et  les exterminerDATAaffreuse tension. Le dimanche matin, la radio annonait la nouvelle que l Angleterre avait dclar la guerre  l Allemagne. Ĉ
DATAils n aspiraient  rien d autre qu  enchaner, dans un effort silencieux et pourtant passionn, des strophes parfaites dont chaque vers tait pntr de musique, brillant de couleurs, clatant d images.P
DATAnous qui attendons de chaque jour qui se lve des infamies pires encore que celles de la veille, nous sommes nettement plus sceptiques quant  la possibilit d une ducation morale des hommes.
BKMK4W*WW*ޭ$#BKMK4^,^^,ޭBKMK4~y:~yޭBKMK4ޭ! BKMK4`ޭBKMK1ޭBKMK4
(I’ve added line breaks for clarity)
As you can see, the problem was that the decoded content was a bit garbled : accents are missing and annotations are not delimited correctly. Turns out, Amazon uses a custom binary format for its sidecars. After encryption, binary decoding, what an adventure 🤠!
When searching for the sidecar application type, I stumbled upon KSP (Kindle Server Proxy), a project to connect a Calibre library to the Kindle seamlessly. It works as a middleware between Amazon and your Kindle, implementing routes of the Whispersync API. It serves content from your Calibre database, or from Amazon as needed: if a book is from Amazon, content is served from Amazon, otherwise it’s served from a local database.
KSP did not need to read sidebars as it was sufficient for it to only pass the content without reading it. It did however need to know how to write sidebars. The code was informative on the binary format used, but I knew I needed to code a sidebar parser.
Bytes in color
At this point, I decided to have a look at the bytes in a graphic form to understand better what was going on. I had read recently about visualising a binary in color so I figured I could try to do the same thing. By reimplementing, I would have more control onto the visualisation and hopefully it would serve when debugging the parser.
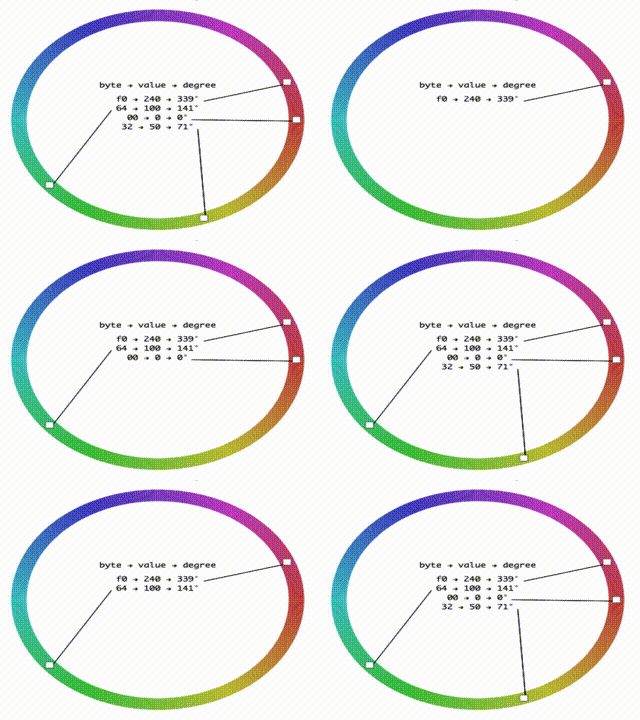
I fired up codesandbox and wrote an app that when given a base64 string would output its bytes colored based on the value of their value. I used the HSL color space with the value of the byte controlling the hue so that nearby valued bytes have similar colors. It is very similar to cortesi’s binvis but this one I could hack more easily to serve my needs.

Coloring bytes..
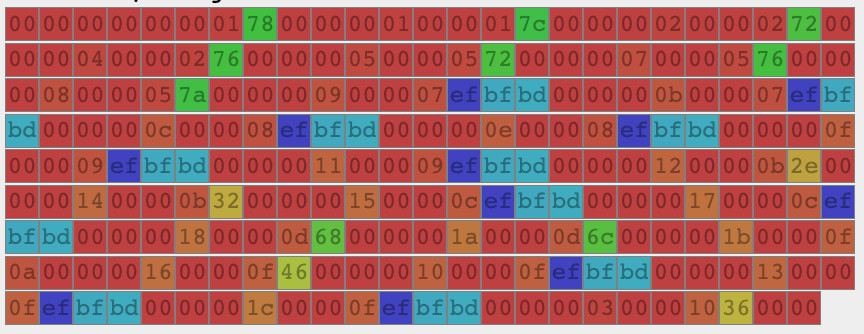
Seeing the data colored helps to see the different parts of the binary format and find patterns. For example, here we can see at the bottom a red/green check pattern. It is a two byte pattern, and we know that at this part, we should have text so it is a good clue that the text is encoded in UTF16.
This app was really helpful when writing the parser since I could better understand on which part the parser was struggling.
To write the parser, I used binary-parser. Its API make it easy to make a parser. To be able to conjugate it with the binary viewer, I monkey patched the code to add before/after indexes to each field so that I could see each field separately in the viewer.
Here is an extract from the parser:
const sidecarParser = new Parser()
  .endianess('big')
  .string('guid', { length: 32, stripNull: true })
  .seek(4)
  .buffer('v1', { length: 4 })
  .buffer('v2', { length: 4 })
  .buffer('v3', { length: 4 })
  ...
  .uint16('next_id')
  .seek(4)
  .uint16('index_count')
  .seek(2)
  .uint16('bpar_ptr')
  .saveOffset('bpar_ptr_index_')
and its usage:
const rawData = new Buffer() // binary data
const data = sidecarParser.parse(data)
// > { index_count: 16, next_id: 5, bpart_ptr: 300, guid: ‘CPAR….’ }
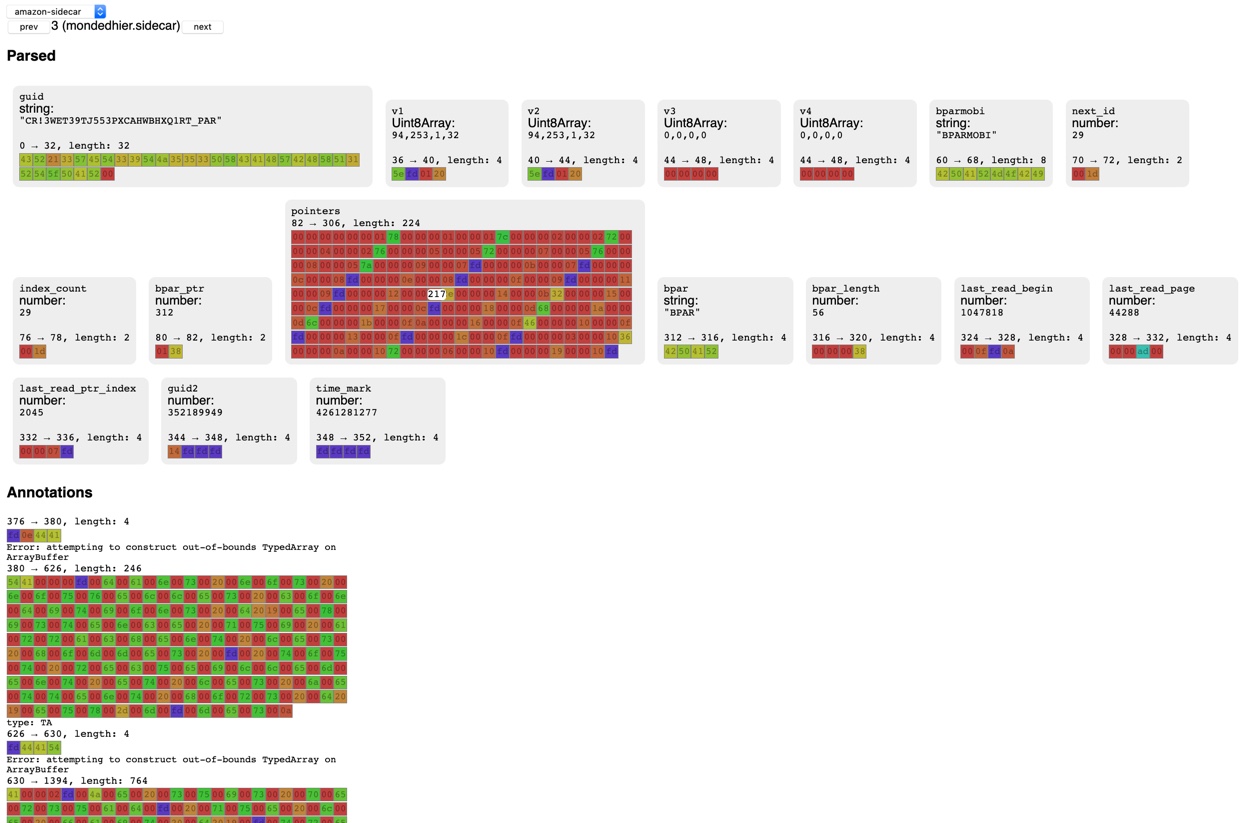
The structure of the binary is as follows:
- A header
- Pointers to the annotations
- Annotations data
When parsed, it looks like:
Incredible endia
To format the bytes extracted from the data section, I used the Uint{8/16}Array
APIs from the browser that serves as views on a byte buffer. This worked well
for Uint8/16 integer buffers. The problem I faced was with the string buffers :
the Uint{8/16}Array APIs work in the platform endianness (to use the native
APIs where possible). My computer was in little endian whereas the annotations
were encoded in utf16 big endian. This meant that if I wanted to read a buffer
with String.fromCharCode I had either to swap the endianness of the buffer or
to use a DataView (Javascript API to read / write data independent of the
endianness of the platform). I did not know DataView at this point so I swapped
the bytes but DataView would have worked since you can choose the endianness
when reading a value.
Data corruption
To test the parser, I downloaded sidecars through the whispersync client I was building and dumped their contents in the test folder. When trying to parse them, the parser was struggling and I could see many “EF BF BD” bytes colored in blue.

Corrupted bytes visible in blue
Those bytes were mainly present in the section of the binary containing pointers to the annotations locations. This made the parser fail. After a bit of struggling trying to shift the data or ignore those bytes, I searched for “EF BD BD”.
EF BF BD is UTF-8 for FFFD, which is the the Unicode replacement character (used for data corruption, when characters cannot be converted to a certain code page). https://stackoverflow.com/questions/47484039/java-charset-decode-issue-in-converting-string-to-hex-code>
I figured out that the request JS library used to fetch HTTP responses
tried to decode the data as UTF-8 by default and failed (as sidecars are
transmitted as binary data over the network). Solution was to put
{ encoding: null } as the request options so that it returns
a Buffer. The buffer can then be encoded in base64 to print it to the console
with no garbled character. This base64 output can piped into base64 --decode
before dumping it to disk (console.logging the buffer would try to
decode the data as utf-8).
HTTP server to explore content
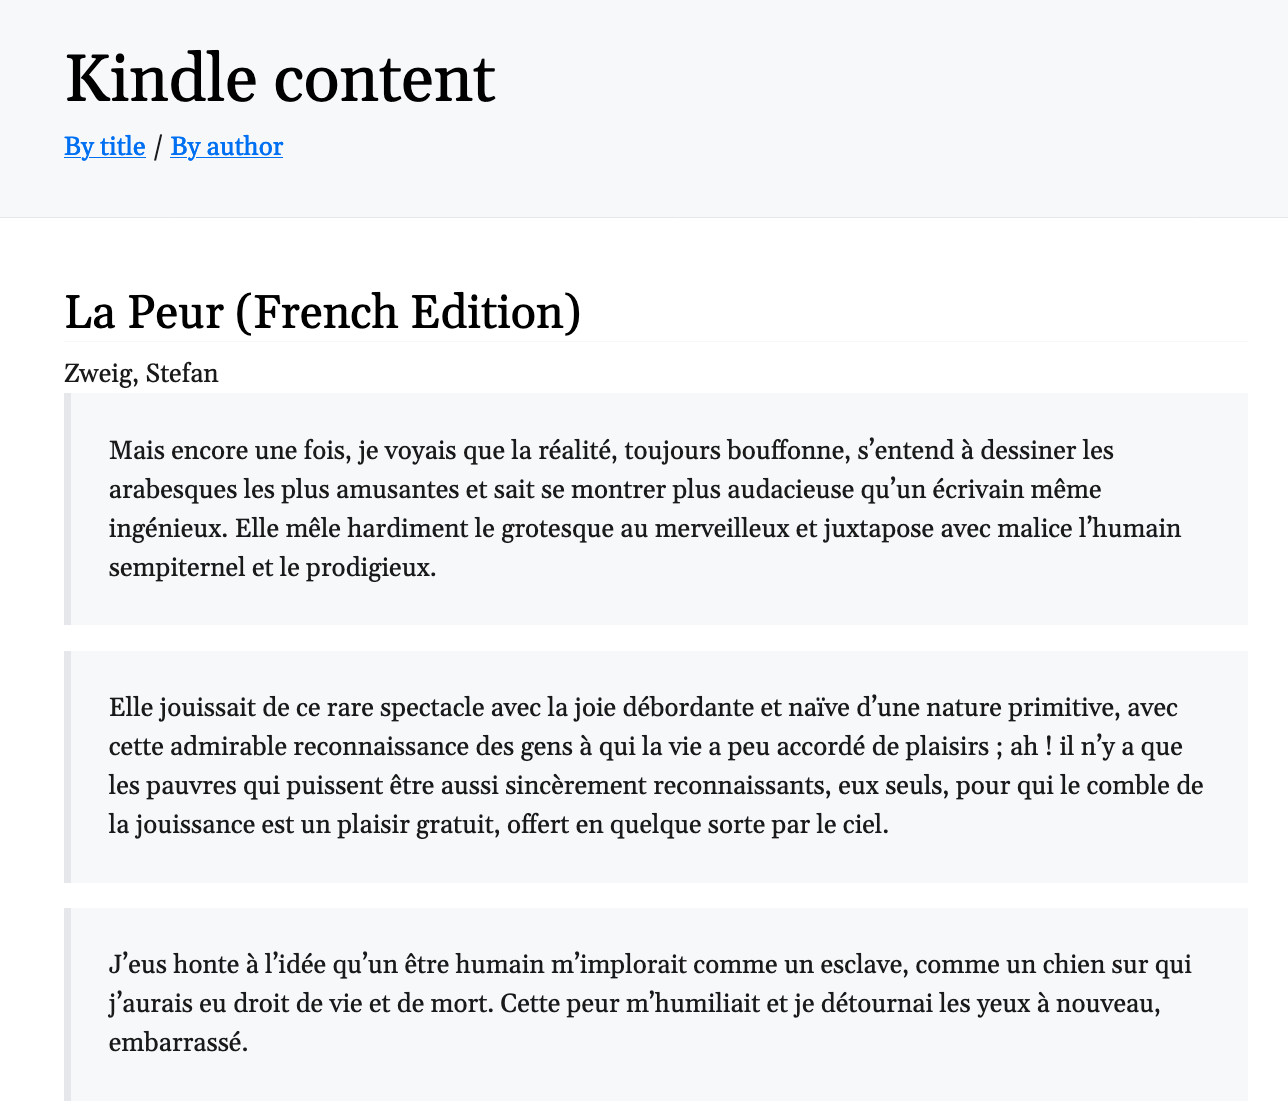
At some point, to be able to explore annotations, it seemed to me that the CLI was a bit limited to explore the content easily. I added a HTTP server serving an index of the books and a book page showing the annotations. The content is fetched from Amazon if it is not on disk, and it is then saved in JSON format for later access.
I used fastify which is an alternative to express that promises to be much faster. It worked well for my simple purposes.
Here are two screenshots:
Conclusion
All in all, it was a really good experience, I learned about
- Man-in-the-middle in practice
- Encryption
- Binary decoding
- String encodings
There was a lot of hurdles but I was really pumped up by the fact that the
data recovered was important to me : I like reading and am now happy
that my highlights will live in a format that I will be able to read
in a long time for now. I am also happy to have them in a simple JSON text format
that I can query using tools I am familiar with jq, rg or grep.
Next plans:
-
make a Cozy connector using the
whispersync-clientto have my annotations automatically synced to my Cozy 🚀. -
see if it would make sense to have some kind of integration with Calibre
The code is available here for education purposes: whispersync-lib-code.
Resources
Several resources were of great help when building this project.
-
Lolsborn’s repos : readsync and fiona-client
- Useful for request signing and starting out the Javascript structure of the Javascript client (turns out Scala is quite quick to convert to Javascript).
-
KSP (Kindle Server Proxy)
- Implementation of a middleware server for Kindle, seamlessly connecting Calibre and Kindle
- Recreates the sidecar, useful to understand the format of the sidecar
-
Reverse engineering a file format on WikiBooks.
Good general information on how to start with the decoding of a binary format.


